
Programming
Serial Port
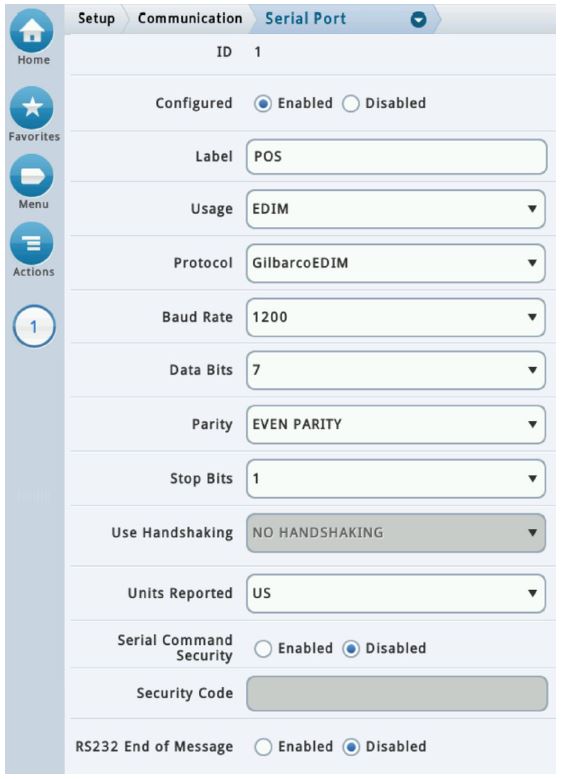
Menu > Setup > Communication > Serial Port
- Configured: Enabled
- Label: Example: EDIM or POS
- Usage: EDIM
Note: When the usage is changed from RS-232 to EDIM, additional options will appear.
- Protocol: See following page.
- Baud Rate, Data Bits, Parity, Stop Bits, Use Handshaking: These settings will automatically be setup when the protocol is selected. Change settings as needed.
- Units Reported: Default is set to US
- Serial Command Security: Disabled
- RS-232 End of Message: Disabled
Installation Hardware
Note: There may be other configurations possible. The following examples are recommended by Veeder-Root. See the POS installation manuals for additional examples and information.
| Controller / POS | DIM Protocol | Installation Hardware |
|---|---|---|
| Passport / EDH | Gilbarco EDIM | Gilbarco M11247B064 connector Veeder-Root 331063-XXX cable |
| Commander | VR Protocol DIM | Verifone 13652-01 connector Verifone 13836-XXX cable |
| Allied / NexGEN | VR Protocol DIM | Allied N9445-ADP connector Veeder-Root 331134-XXX cable |
| NCR / Radiant | VR Protocol DIM | Verifone 13652-01 connector Verifone 13836-XXX cable |
EDIM Settings
| Controller / POS | Protocol | Baud Rate | Parity | Length | Bits |
|---|---|---|---|---|---|
| Passport / EDH | Gilbarco EDIM | 1200 | Even | 7 | 1 |
| Commander, Allied / NexGEN, NCR / Radiant* | VR Protocol DIM | 9600 | Odd | 7 | 1 |
* Default units for this EDIM is Metric / Liters.
Troubleshooting
The console will display an E1 Comm Alarm, if there is no communication between the EDIM and POS. This can be caused by a bad or disconnected cable/connector, incorrect programming, a bad EDIM or a POS issue.
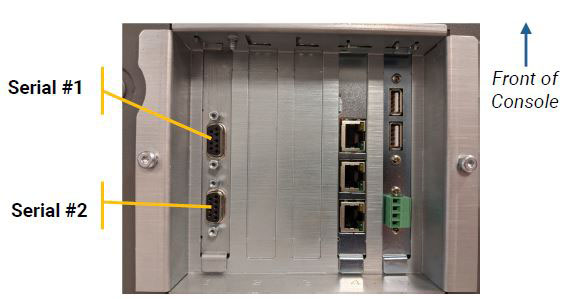
- Confirm the correct EDIM port is being used. Port 1 is closest to the front, port 2 is closest to the back (wall).
- Confirm the cables and connectors between the console and POS are firmly connected. A loose or disconnected cable will cause communication issues.
- Check for correct part numbers on all cables and connectors.
- Confirm the EDIM is programmed correctly on the console.
- Confirm POS is configured for BIR and correct communication board settings.
- Verify there is communication in the EDIM diagnostics:
Menu > Diagnostics > Module > Comm- Monitor bytes and confirm both the bytes received (Rx) and transmitted (Tx) are similar in numbers as shown below.
- Monitor bytes received and transmitted, confirm the numbers increase over several minutes.
- Confirm there are no errors.

Testing the EDIM Port
|
Requirements:
Note: A straight through connection will not work. |
Cable Examples: |
Testing Steps:
- Using the null modem RS-232 cable, connect a laptop to the EDIM port in question.
- On the console, change the port usage from EDIM to RS-232.
Note: Changing the port usage may also change the Baud Rate, Data Bits, Parity and Stop Bits back to default settings.
Note: When the port is programmed as an EDIM, it will not communicate with a laptop. The port must be set to RS-232 for laptop communication.
- Open PuTTY
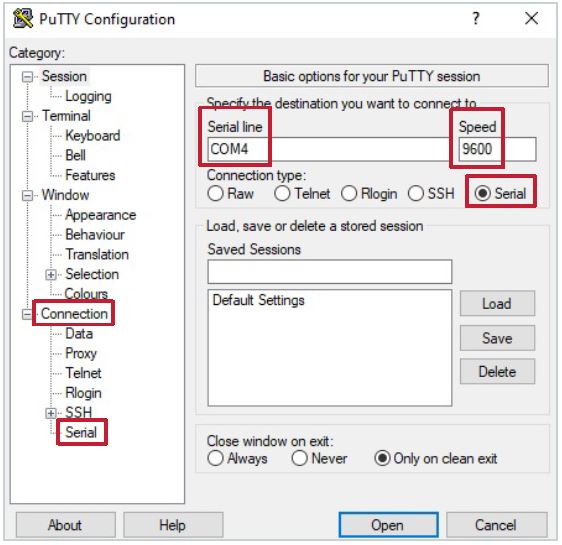
- Basic Options for your PuTTY session
A. Connection type: Serial
B. Serial line: Type in the laptop’s comm port. For example: COM4
C. Speed: 9600
- On the left side of the screen, under
Category select Connection > Serial
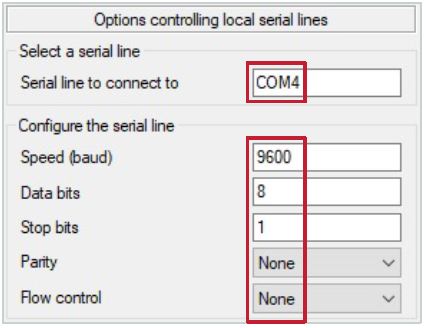
A new screen will appear. - Serial line to connect to: Confirm laptop’s comm port
- Configure the serial line: Confirm settings in PuTTY match the console
- Flow Control: None
- Press Open
- A blank screen will appear.
- For the inventory report, type: <CTRL-A>200
Inventory Report Appears
If the Inventory Report appears, as shown below, then this confirms the EDIM/RS-232 port is working fine.
If the E1 comm alarm remains active, then this indicates an issue external to the console.
No Inventory Report
If there is no response to the serial command, then this can indicate a bad RS-232 port.

Further Information
- Contact Veeder-Root Technical Support at 1-800-323-1799 for additional help or questions.
- Learn more about Business Inventory Reconciliation
- Technical Support Notification - TLS-450PLUS - EDIM Programming & Troubleshooting (576047-387)